Wednesday, June 14, 2017

Bread

Bread isn't really my thing anymore. First it was because of the gluten, and then came paleo. As for my oldest son? Bread is totally his thing. But he can't eat gluten. And he has a dairy allergy. Oh, and eggs bother him as well. How does one make bread without gluten, dairy or eggs?

I found a gluten-free vegan bread recipe from forkandbeans.com, and then iterated until I got it just right.

I've only ever worked with this recipe in a bread machine that has a gluten-free setting. (The original recipe is for manual oven baking.) So I can't vouch for how it might work via a manual, two-rise cycle and then baking in an oven. But if you have a bread maker with a gluten-free function, you're in luck!

Oh, and I ought to mention that my recipe is not vegan due to the bone broth, which can be successfully replaced with either water, milk or a milk alternative (I have used all 3).

And a quick note about the flour. This recipe requires 3 and 1/4 cups of flour. It can be all one type or a combination. The combination I've settled on provides a great texture, a preferable macronutrient composition (relatively high in fiber, fat and protein and low in simple carbohydrate compared to typical breads), and a great flavor (according to my son--I haven't tasted it).

Without further adieu...

Ingredients
Dry
1 C teff flour*
1 C almond flour
1 C namaste flour
1/4 C flax seed meal
1 tsp baking powder
1/2 tsp baking soda
1/2 tsp salt
2 tsp coconut sugar (to feed the yeast)
2 1/4 tsp (or one packet) active dry yeast (last ingredient added)

Wet
1 C warm bone broth (I don't measure the temperature anymore, but 125 F is a good target)
3 tbsp olive oil (coconut oil, ghee, duck fat--they all work as long as they're in liquid form)
2 tsp apple cider vinegar

The "egg"
1 C warm bone broth
5 tbsp chia seeds (I use whole seeds--ground will work)

Instructions
  1. Mix the "egg" ingredients together, and stir every minute for 5 minutes or less, then add to the bread machine pan. (I make sure the mixture is homogeneous but still fluid--I have found that if it gels too much, it affects the mixing process of the bread machine and hence the texture)
  2. Place wet ingredients in the bread machine pan
  3. Reserve yeast and add all dry ingredients to the pan
  4. Add the yeast last
  5. Select the gluten-free cycle and press start
  6. After 2-4 minutes, scrape the pan with a rubber scraper
  7. Let your machine do its work 
  8. Remove promptly after the baking cycle. Place on wooden cutting board or surface for the first 12-24 hours, uncovered
Subsequently, store in a partially sealed container on the counter or in the fridge. It hardens significantly in the fridge, so I keep it in a tin on the counter, and place the lid off-center to allow for breathing

It keeps well for 4-7 days, depending on humidity.

If the bread hardens a bit (in the tin on the counter), I close the lid completely for a few hours or overnight and that usually does the trick (moistens it up again).

Making life easier
The measuring of dry ingredients is the most time-consuming step, so I often measure out dry ingredients (except for yeast) for several loaves, and store it in individual canning jars in order to expedite the process when I'm ready to make bread.


*The most economical way to obtain teff flour is to buy whole grain teff (I find it in the bulk bins at Whole Foods) and grind it (I use my Blendtec).


Friday, February 20, 2015

Strawberry Rhubarb Crisp (GF, DF)

Strawberry Rhubarb Crisp
(Gluten-free, dairy-free)

I developed this recipe for a cooking demo at my local farmer's market, in an effort to promote strawberries and rhubarb! This dish tastes like summer to me!

You can use any sweetener (honey, sugar, brown sugar, cane sugar, etc.) in this recipe; I chose coconut palm sugar as an unrefined substitute for brown sugar. While on the topic of sugar, this recipe used approximately a quarter of what is called for in traditional recipes.
Ingredients
Fruit layer:
3 C strawberries, sliced (almost 1 quart of fresh berries)
3 C rhubarb, cut into 1/2 inch chunks (about 4 large, tall stalks)
1/2 C sugar, or less (I used coconut palm sugar)
Crisp layer:
1 1/2 C rolled oats (gluten free)
3/4 C shredded coconut (unsweetened)
1/4 C coconut oil (you can use butter if dairy isn't a concern)
1/4 C sugar (I used coconut palm sugar)
Instructions
  1. Preheat oven to 375F.
  2. Combine fruit and sugar, mix well and set aside.
  3. Combine ingredients for the crisp layer in a separate bowl and stir to prepare a homogeneous mixture.
  4. Grease 8x8 baking dish (glass or ceramic/stone. If using cermaic/stone, place dish in stove to preheat for five minutes).
  5. Add the fruit mixture to the greased dish, and spread evenly.
  6. Add the crisp layer on top, spreading evenly.
  7. Cover with foil and bake 10 minutes. Remove foil and bake 30 minutes, or until the oats are golden brown. If you question whether it needs more time, poke down with a fork a few times to ensure that the rhubarb is soft. If not, cool a bit longer.
  8. Let cool one hour before serving.
If dairy isn't a problem for you, consider topping with whipped cream! (A quick and easy recipe: 1 C heavy whipping cream, 1 tsp vanilla extract, 1 tsp sugar, optional. Blend or whip until you have whipped cream!)

A generous scoop of Trader Joe's canned Coconut Cream is a lovely dairy-alternative!

I made probably seven iterations of this dessert, and continually failed to take photos. Here's one that I snapped this morning while doing a cooking demo at my farmer's market.

Sunday, July 27, 2014

Ratatoullie

Today was the second cooking demo of the season at my local farmer's market. I really enjoy talking food with people, and mingling with the farmers afterward when I do my shopping! One of the best things about sharing recipes with the market goers is inspiring new ways to enjoy foods (or fostering courage to try new foods)!

It's the perfect time of year, here in Michigan, to enjoy Ratatoullie. A traditionally sautéed dish, my ratatoullie recipe involves roasting--roasted vegetables are beautiful, flavorful, and absolutely delicious! Plus, it's a lazy way to prepare vegetables--just chop, roast, then eat! (I was initially inspired by this recipe online: http://m.allrecipes.com/recipe/18411/ratatouille, and adjusted it to my liking.)


Ingredients
1 zucchini, halved and sliced
1 yellow squash, halved and sliced
2 C mushroom, sliced
2 tomatoes, halved and sliced
1 eggplant, cubed
1 bell pepper, 1/2 inch squares
1 onion, sliced
1 head garlic, minced or chopped
2-4 tbsp olive oil
Salt to taste
Pepper if preferred
Oregano and basil to taste 

Instructions
1. Preheat oven to 350F. (If cooking with stoneware like I do, place it in the oven to preheat for a few minutes.)

2. Sauté 2 tbsp oil and garlic for about five minutes. Toss the eggplant around until coated. (If you prefer larger pieces of eggplant, cook a few minutes.)

3. Place contents of pan and other vegetables and spices into 9x13 baking dish. Add remaining oil, mix around to coat veggies. 
4. Bake 30-40 minutes. Don't stir. If you notice water glistening at the base of the pan, it's done! (Remove the dish before too much water leaves the vegetables, as it will act to steam the veggies, leaving them soggy instead of perfectly roasted.)

Serve!

This dish makes a nice accompaniment to any meat, or can be used to top pasta or rice if you eat grains. (Forego pasta or rice if you're keeping it Paleo.)

Tuesday, June 10, 2014

Bacon avocado cups

One of my favorite Paleo appetizers/mini-meals is bacon avocado cups. I picked up this recipe from Primally Inspired, and it's always a crowd pleaser not to mention delicious and filling.


Ingredients
2 avocados, halved, seeds removed (roll avocados on counter prior to cutting to pull flesh away from skin)
4 slices bacon, cooked and chopped (strain and save your bacon fat for later!)
3 tbsp grass-fed butter
1 tbsp balsamic vinegar
1-2 tsp minced garlic
Fresh wedge of lemon

Instructions
  1. Place avocados on a serving tray.
  2. Rub lemon wedge against exposed avocado to prevent browning.
  3. Fill each avocado with bacon.
  4. Combine butter, balsamic and garlic in a small sauce pan over medium heat. Stir well and continuously. Kill the heat once the mixture comes to a boil.
  5. Drizzle glaze.
  6. Place any leftover glaze in a small decanter or cup (Iike to eat half of the avocado cup then add more glaze).
  7. Serve and enjoy!
This recipe is easy to scale up. The photo above shows a triple batch.

*Variation: I have also cut up avocados into chunks, added the bacon and glaze, and served it as a side. This could also make a nice topping for chicken or beef (perhaps a burger topping).

Oh, to hoe

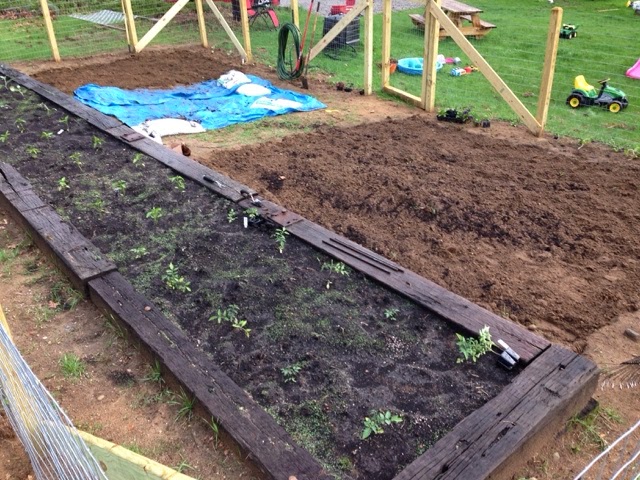
I planted my garden between mother'a day and Wednesday, May 13, in accordance with the Farmer's Almanac's recommended planting days. Kevin had tilled the "new section" of the garden last fall, but as I learned, spring tilling would be ideal. I hoed the new beds by hand, which was an immense workout. I found the physicality of it to be enjoyable although demanding, but I'm thinking I might invest in a rotatiller for future planting seasons. Here is a few photos of the prepped beds. 
This is a 10x10 (or so) bed.
Ready for planting!
I only managed to prep about 1/3 of the other 10x10 bed (far side of the photo, next tot he tarp--the tarp is covering the un-prepped portion of the second 10x10 bed). I intend to prep it for a late planting of cold leafy crops.
I will follow-up soon with progress photos, including some of my fruit garden, where strawberries abound!

Thursday, June 5, 2014

Mediterranean pizza with cauliflower crust

The only Paleo-ish baked good that's a staple in our household is the Civilized Caveman's Paleo Banana Bread. I make it for the kids; they have a thick slice (I typically make four mini-breads per batch) for their 3:30 snack. I like that there's no added sugar (sweetening is from bananas), and it's a high-fat snack to satiate the kids until our 6pm dinner time. It's also fast and easy (I make one batch every week or two). But every once in a while, it's nice to experiment with a new food, something different to spice things up a bit. My husband had heard about cauliflower pizza crust, has been mentioning it for months, and I finally looked through recipes and decided to try it out.

I'm actually really impressed (and surprised) with how absolutely delicious this pizza is! Prior to "going Paleo" in April 2013, I would have thought a pizza without traditional crust and gobs of cheese to be plain and unappetizing. Yet, while eating this concocted pizza, I had not the slightest interest in pizza-as-I-knew-it-pre-Paleo. I know that my palate has changed significantly since eating a predominantly Paleo diet, and this is one testament to that.

On to the cooking! I started with this recipe, and modified it to my liking.

Ingredients
Crust
2 1/2 C cauliflower, riced
1 C blanched almond flour
1 tbsp olive oil
1 tsp oregano
1 tsp basil
Pinch of salt
Olive oil for greasing pan/stone

Toppings
6 baby Bella mushrooms, sliced
1/4 C garlic, sliced
1/3 C red onion, sliced into rings
1 jar (3/4 C) marinated artichoke hearts, strained and cut into 1/4 inch thick slices
2 tbsp sundries tomatoes
Olive oil for sautéing
8 ounces prosciutto (sliced in half, then rolled up--next time I will cut the rolls into thirds because I felt the size I used was too big)

1/2 C tomatoes or pizza sauce, or 1 C sliced tomatoes

Instructions
Crust
  1. Preheat oven to 425 F (if using a baking stone, put it in the oven to warm while prepping the dough)
  2. Heat some olive oil in frying pan, add cauliflower and cook about 10 minutes, stirring frequently (medium-high heat). Keep the frying pan for sautéing the toppings later.
  3. Place cauliflower into a mixing bowl and add the remaining ingredients
  4. Mix well (I used medium speed on a stand mixer for about 3 minutes)
  5. Remove stone from oven, and brush with olive oil (or grease a baking sheet with olive oil)
  6. Place dough mixture in middle of stone. Use hands to flatten and spread mixture, being careful not to burn oneself. I used a 16 inch stone and the dough didn't take up the whole thing (doubling the recipe would make a full 16 inch pizza)
  7. Place in oven, and bake 25 - 30 minutes
Toppings
  1. While the crust is baking, heat some olive oil in the frying pan, then sauté the onions, garlic and mushrooms until somewhat translucent (about 10 minutes). Add sundered tomatoes and artichokes, push around to coat, then turn off heat and let everything in the pan. 
  2. Once the crust is finished baking, remove from oven and add the sauce.
  3. Spread the sautéed toppings evenly across dough, and then add the prosciutto.
  4. Bake 10 more minutes
I served this pizza hot, and found that the crust broke apart a bit and was even somewhat soft. We ate it using knife and fork, but it was absolutely delicious!! 

Monday, May 12, 2014

2014 Gardens: New fence, and plantings

Vegetable garden
My husband was kind enough to tear down the deer fence that served as my garden's perimeter for two years at the end of last season;  he also rotatilled enough ground to more than double the size of my gardening space. Once spring was upon us, he designed and bought supplies for the new fence.
I managed to remove a fraction of the countless maple seeds that sprouted in my raised bed, with the help of my oldest son and the girl next door.
The posts are up! Construction is underway; I was so excited to have a solid, new fence, and the boys were equally enthralled! I was already dreaming of the number of climbing plants I could sow along the perimeter!
The fence is complete!!
Enter Mother's Day: I picked up vegetable plants at the Royal Oak in Bloom market after a lovely breakfast at Cafe' Muse (my favorite). Michael chose the flat of petunias as my mother's day gift :-)
A table littered with things to be planted, including the squashes and melons I started from seed.
I began planted green beans, squashes (long island cheese pumpkin, spaghetti squash, acorn squash, cucumbers and pickling cucumbers) and melons (three varieties of watermelon as well as cantaloupe) along the perimeter on Mother's Day, as well as 8 asparagus roots and 1 sweet potato plant. Today I began populating the raised bed; I planted a variety of tomatoes (roma, cherry, yellow pear, and big boy), peppers (red, orange and yellow sweet, plus banana), and cruciferous vegetables (red and green cabbages, broccoli and cauliflower). I planted Brussels sprouts along the remaining open space of the perimeter.
Voila!!
Pretty little petunias!
Fruit garden
The far side of this garden is laden with strawberry plants (all around the lilac bush). When I first started weeding this bed a few years ago, I almost plucked them all, thinking they were weeds. Thankfully I had acquired a strawberry plant amongst others from my colleague; when looking for a place to plant the strawberry, I realized my silliness. 

The strawberries are propagating nicely, and I've decided to add more fruits to this garden (amongst other edibles).
The garden "as-is" (minus some weeds); prior to adding edible plants.
This lattice here is rather lonely. I planted luffa gourd during my first growing season, and they utilized the lattice rather well. Since then, it's just been the clematis (except for some failed cukes one year), which never really flourishes. I grew up playing in and eating from a large grape arbor in my grandmother's yard, which inspired me to start some grapes here with the lattice .
This photo isn't particularly telling, but I planted 4 green zucchini, 4 sage, 1 basil, 1 blueberry, and 2 concord grapes (one on either side of the lattice). I have another grape to plant (I forget the name of it),  and plan to place it near the clematis.
More work to do
I still need to clear the remaining grass from the rest of my vegetable garden, and then get to planting seeds and other root vegetables (such as beets and onions that I bought from the market yesterday). I barely have enough room for everything!!!

Thursday, May 8, 2014

Preparing to plant

I grew these babies from seeds!! Gearing up to plant next week, I'm conditioning these plants to the outdoor climate. An hour of afternoon sunshine, and protected overnights (inside garage).

Monday, February 3, 2014

Cave Cravings Review: Part 1

I was contacted by Cave Cravings and asked if I'd blog about my experiences with their products; naturally I said yes!

I received my box on Friday, January 31, and felt much like a Paleo-kid at an olive bar when I saw it! My youngest son had fallen asleep in the car, so I decided to continue driving (instead of going home) to take advantage of the car nap; I pulled up to my mailbox as I passed our driveway, plopped the box on my front seat, and worked to open it before pulling away! So exciting!

I'm sure many of you Paleo-goers find snacks-on-the-run to be one of the trickiest aspects of a Paleo lifestyle. I almost always have items such as Larabars, nuts, dried fruits, veggie sticks, and homemade Paleo banana bread on hand for easy snacks and snacks that travel well, but sometimes planning goes awry for one reason or another, and it's in those moments when I I really wish it was easier to come by pre-packaged snacks that are within reasonable limits of the Paleo diet. Enter Cave Cravings!


So what is Cave Cravings? Here's the mission statement from Cave Craving's website:
We believe in delivering a healthier you to your doorstep every month.  Our mission is to cultivate a variety of healthy snack options to fuel your busy life.  We know that however well intentioned people are it is simply hard work finding tasty, organic, unprocessed foods to get us through the day.  We also know that there are many amazing creators of deliciously healthy, all natural, snacks trying to gain recognition.  Our goal is bring these two groups together for a tasty (and healthy!) party.

We work hard to find organic items that are 100% natural, satisfy your cravings and taste amazing. Everything inside your monthly box will be good for you so that you can feel great about what you're eating. Each month we are delivering a healthier you!
Now on to some of the products from the little white box of goodness!

My family and I have eaten three packages of snacks thus far. I managed to consume all nine of the mini Coco-Roons (Lemon Pie flavor. I LOVE lemon. I've loved lemon since I was a fetus; you can ask my mom if you don't believe me) by Wonderfully Raw. They're USDA organic and contain seven ingredients: raw coconut, raw coconut flour, unfiltered maple syrup, raw cold-pressed coconut oil, lemon zest, vanilla extract, and Himalayan crystal salt. A straight-laced, Paleo puritan might not go for these, but I certainly would as an occasional snack. Did I mention that I love lemon?

My  three-year-old son (who is immensely picky, particularly about textures) was delighted to enjoy a Caveman Cookies Original, even though it contained raisins! He ate it without curling into a wailing pile on the floor, so I knew he liked it, and asked whether it was yummy or delicious. He answered, "Delicious." The cookie (one of four in the box I received) contains honey, almond meal, walnuts, raisins, ginger, nutmeg, and cinnamon. I love that each cookie is individually-wrapped, making it super easy to keep them in a diaper bag, backpack, or purse.

My husband ate one of the two Bearded Brothers' Radical Raspberry Lemon Energy Bars, and enjoyed it thoroughly. He exclaimed that both the texture and flavor were great. I'm looking forward to trying the other one!

While I could have easily eaten just about everything from the little white box already, I exercised restraint, leaving the other snacks for another day (and blog). Stay tuned for Part II!

Note/disclosure: I received this complimentary Cave Cravings snack box in exchange for agreeing to blog about my opinion of the products and the program. I share no other affiliation with the company. I am neither compensated in any way (aside from receiving the products), nor am I required/expected to provide positive reviews. 

Sunday, November 24, 2013

Savory, pumpkin-apple chicken chili

Fall is my favorite season of the year. Cool air. Vibrant trees. Leaves dancing in the streets. And best of all, pumpkins and apples!

When asked to demo another recipe at the Springfield Farmer's Winter Market, I wanted to incorporate tastes of the season. Inspired by a cherry-peach chili recipe that my husband sampled while in Traverse City back in October, I decided to make a pumpkin (un-spicy) chili. It tasted fine, but my husband decided it needed something "more," so he went outside and picked a few tart apples from a tree in our yard. I cut them up and added them in, and they absolutely made the dish (thanks, husband)! That's how the pumpkin-apple chili was born.

Ingredients
2 pounds ground chicken (or turkey)
1 large red onion, peeled and chopped
1-2 heads garlic, peeled and minced
coconut oil (or other cooking oil)

3 C chicken or vegetable broth
3-4 C pumpkin puree
4 C black beans (cooked or canned)
1 tsp sea salt

2-4 tart apples, peeled and chopped (don't peel until needed)
4-6 pie pumpkins, rounded gourds or squashes (option)


Instructions
  1. Add a few tablespoons of oil to a frying pan over medium-high heat. Sauté onion, garlic, and ground meat (about five minutes to brown on all sides). Reduce heat to medium, and cook for another fifteen minutes (stirring occasionally).
  2. While meat is cooking, add chicken broth, beans, pumpkin puree and salt to a stock pot. Cook on medium heat, stirring frequently.
  3. When the meat is done cooking, strain the fat off, and scoop the contents into the stock pot. Mix thoroughly. Cook fifteen minutes.
  4. If you'd like to serve the chili in pumpkins or gourds, remove the tops, scoop out the seeds, and have them ready to go! (OPTIONAL)
  5. Peel and cube the tart apples (Northern Spy are my fav), and add to the stock pot for the last five minutes of cooking. Stir well.
  6. Serve in the pumpkins/gourds, or normal bowls :)

*Vegan potential -- use vegetable broth instead of chicken broth, and either omit the chicken/turkey, or sauté tofu as a substitute (allow an extra ten-twenty minutes to cook the tot firmly, if desired).

Thursday, November 21, 2013

Bruschetta

8 Roma (or 4 Beefsteak) tomatoes, peeled, de-seeded, and diced
1/4 - 1/2 head of garlic, minced
1/4 red onion, chopped
2 tbsp olive oil
2-4 tbsp balsamic vinegar
2 tbsp fresh basil, chopped (or 2 tsp dried)
1 tsp organo (or 1 tbsp fresh oregano, chopped)
sea salt & black pepper to taste

1. Combine ingredients in covered container, stir or shake well
2. Refrigerate 4-12 hours prior to serving for best results (taste improves as it marinates)

Easy, and SO delicious!

This bruschetta makes a great salsa, or can be used to top spaghetti squash instead of using a sauce!

If you're not adhering to a gluten-free or Paleo diet, feel free to warm a baguette in the oven and serve the bruschetta over top, old school!!

Monday, November 11, 2013

Coconut oil pan-fried breakfast plantains


Ingredients
2 plantains (sort of ripe but still firm)
1 sweet onion
Sea salt
Coconut oil

Instructions
1. Peel the plantains. Cut into small cubes.

2. Peel onion and slice/cut to preferred shape (I like large chunks).

3. Heat 2-6 tablespoons of coconut oil in frying pan on medium heat.

4. Add plantains, push around and coat well with oil. 

5. Add the onions. Cook 5-10 minutes, moving contents around to prevent burning. Cooking too long will provide a nicer crunch, but the plantains will dry out a bit inside. I find best results by calling it quits once the plantains and onions show first signs of looking translucent.

ENJOY!!!!

Sunday, October 6, 2013

Flakey apple tarts

They're so flaky and delicious -- when I took these out of the oven, I felt like I was staring at something from a fancy pastry shop in Paris! Okay, they'd be much prettier if made by an ACTUAL pastry chef, but, their flakiness is nothing short of divine!
The weather wasn't particularly beautiful today in Davisburg, but the farmer's market went on nonetheless! I demonstrated this recipe for apple tarts; their flaky crust left mouths happy.

I have to credit my friend, Annette, for sharing her pie crust recipe and teaching me how to make such a lovely and delicious pastry! I adapted the apple filling recipe from that for apple pie out of a Betty Crocker cookbook.

The recipe is simple in terms of its ingredients, but technique is key. Having the right tools on hand will facilitate success (flaky crust). It's good to have a vision of the whole process before starting, to foster efficiency. Give yourself two hours to make four dozen tarts (if you finish a bit early, brew up that coffee to enjoy along with your freshly-baked, flaky tarts).

If you are experienced with pastry-making, then feel free to skip straight down to the recipe. For those of you who want some tips for perfecting your crusts, or are beginning, the following tips and explanations should set you up for success. (Remember, practice makes perfect ;)

Tips and technique
For best results, be sure that your lard (and/or butter) are refrigerated for a few hours prior to making the pastry; leave it/them in the fridge until ready for use. COLD is key!!

Before you dive in to baking, round up your tools:
  • Pastry cutter
  • Marble slab or cutting board, or marble/granite/travertine counter top
  • Marble rolling pin
  • Apple corer/slicer (or knife)
  • Peeler
  • Mini-muffin pans/tart pans (enough for four dozen)
  • A two or four cup volume is sufficient. Ultimately, you'll use 1/3 - 1/2 C water (estimate -- I've never paid attention to the precise quantity)
  • A pyrex measuring cup (or other decanter) filled with ice + water (heavy on the ice)
  • Wooden spoon
  • Soup spoon
  • Butter knife
  • Small, glass container
  • Food scale (or 1 C measures for dry and wet)
Now, here's a high-level overview of the process for making these delectable tarts:
1. Prepare pastry
2. Let set for 10 minutes -- pull out tools and ingredients for filling
3. Place pastry in the fridge for thirty minutes -- prepare filling, preheat oven
4. Remove pastry from fridge
5. Create tarts in muffins pans
6. Bake -- start cleaning up that mess!
7. Cool and serve

On to prepping and baking!!

Pastry/crust
Ingredients
1 pound (3 + 3/4 C) all-purpose flour (keep the bag of flour handy for later)
1/4 pound (1/2 C) lard
1/4 pound (1/2 C) butter
Pyrex measuring cup (or other decanter) filled with ice + water (heavy on the ice)

Feel free to use 1/2 pound lard, or 1/2 pound butter, if you prefer. I think the half-and-half combo of each (per the ingredient list) makes the best crust.

Instructions
  1. Place 1 pound of flour in a large mixing bowl
  2. Remove the lard and/or butter from the fridge -- measure it and place it in the bowl with the flour
  3. Use a pastry cutter to cut the pastry into the flour. Go slowly, and do not overwork the mixture. Use a knife or fork to scrape the mixture that gathers on the pastry cutter. Continue cutting until the lard/butter chunks are pea-sized. Err on the side of too big rather than too small
  4. Pour a small amount of water (2-3 tbsp) over the mixture. Using a fork, start pulling from the edge of the bowl into the center, slowly, and turn the bowl, repeating the whole way around. Once the water has been absorbed, add another few tablespoons. (I use a fork while pouring to prevent the ice from falling into the pastry.) When a ball starts to form in the center of the bowl (or rather, when the mixture starts to adhere to itself), stop. Err on the side of too dry rather than too wet
  5. Gently gather mixture together by pressing it together with your hands -- just two or three gentle squeezes will do
  6. It's best to flour your surface prior to turning out the pastry onto it
  7. Turn the mixture out onto a marble slab. If it falls apart, assess whether it seems too dry in the middle. You can drizzle another few tablespoons of water if needed. 
  8. Choose a cool part of your kitchen to work (i.e. avoid working directly next to the oven)
  9. Gently press the mixture together, if needed. Cover with the bowl, and leave the pastry set, on the counter, for ten minutes                                    
  10. After ten minutes have passed, place the "ball" of pastry back into the bowl, cover the bowl (with a towel, plastic, or lid), and place in fridge for thirty minutes
  11. Make the filling while waiting for the pastry to chill 
Apple filling
Ingredients
6 C apples, peeled, cored, diced into small chunks (pea-sized)
1/2 - 2/3 C sugar (or honey)
1 tsp cinnamon (or more, to taste)
2 tbsp butter, melted
pinch of salt
Add other spices, such as allspice or nutmeg, to taste, if preferred (I prefer not)

Instructions
  1. Assuming that your pastry is resting, covered, in the fridge, go ahead and preheat the oven to 425F
  2. Mix all apple filling ingredients together in a medium-size bowl; combine thoroughly
  3. Let the mixture set out on the counter while working with the pastry to fill the tart pans
Create the tarts
  1. Sprinkle a generous layer of flour over the marble slab
  2. Remove the pastry from the fridge. Gently remove and place about one-fourth of the pastry onto the marble slab. Cover the remaining pastry and return to fridge
  3. Gently but firmly press down on the pastry to form it and spread it out slightly, in preparation for rolling
  4. Sprinkle the top of pastry with flour
  5. Start in the center, and use the rolling pin to work the pastry out in one direction (somewhat gently). Return to the center and roll the other side out
  6. Gently lift the pastry and flip it over -- if it seems to be stuck, use a butter knife to release the pastry from the slab. Sprinkle more flour
  7. Sprinkle a but more flour on top, and roll it out a bit more. The thinner the better, but not so thin that it's difficult to handle. If it's your first time making pastry, err on the side of thick -- it just may turn out more chewy than crispy
  8. Caution: avoid balling up the pastry and "starting again" -- the more it's worked, the less flaky (and more chewy) the crust will be after baking
  9. Don't worry too much about clean edges -- it won't matter much once you fill the tart and fold the pastry and pinch it together)
  10. Cut the pastry into 2.5-3 inch squares
  11. These are a bit thicker than optimal
  12. Place squares into the muffin pan (I find it easier to start filling the inside spaces of the pan and working outward), leaving the pastry draped outward (you'll want to fold it over top of the filling). Continue until you are out of pastry
  13. Spoon apple filling into the pastry -- it should be at least level with the top of the pan
  14. I haven't perfected the aesthetic yet, but they taste fantastic!
  15. Fold the edges of the pastry in to the center, and pinch together gently. 
  16. Repeat steps 1-12 until all of the pastry has been used or you run out of muffin pans!
  17. Place pans into the pre-heated oven, and bake for 20-30 minutes, or until golden brown. If you decide to use regular cupcake-size pans instead of mini's, they may need 45 minutes or more to cook fully
  18. Remove from oven and let cool for twenty minutes
  19. Remove from muffin pans -- they should pop right out, unless some of the filling oozed out at the seams, in which case I like to use a butter knife to release the tart from the pans
  20. Enjoy!
Vegan potential: use margarine or palm shortening (instead of butter and/or lard).

Storage: they should freeze/defrost well -- store in Ziplok bags, and allow to defrost on the counter.

Sunday, September 29, 2013

Spaghetti squash in garlic-cream sauce (dairy-free) topped with pumpkin-kissed meatballs

I've been doing cooking demos at my local farmer's market, and made this recipe today. It was a crowd-pleaser to say the least, despite the chilly, rainy fall day that was upon us.

Spaghetti squash in garlic-cream sauce (dairy-free)
Ingredients:
1 can full fat canned coconut milk
1 spaghetti squash, halved, seeds removed
1-2 heads garlic
A few sprigs of fresh basil (2-4 tbsp, chopped)
2 tsp dried oregano
sea salt to taste

Instructions:
  1. Preheat oven to 425 F
  2. Place spaghetti squash halves, face down, on baking sheet
  3. Bake for 20-25 minutes (until a fork pokes through easily -- don't over cook or it will become too mushy)
  4. Remove squash and separate strands of squash away from the skin with a fork (the strands are long and thin, similar to spaghetti, but thinner and more fragile)
  5. Empty the can of coconut milk into a large skillet. Add herbs, spices and minced garlic. Cook on medium high until boiling, stirring frequently Reduce heat to keep the mixture simmering, and stir continuously for 10-15 minutes, until it thickens
  6. Reduce heat to low, add squash strands, and stir well, until the squash is warm
Pumpkin-kissed meatballs
Ingredients:
1 pound ground beef 
1 egg
1 head garlic, peeled, minced
1/2 C pumpkin puree (fresh or canned)
1/4 C chopped kale
salt & pepper to taste
coconut oil (or olive oil)
plate or tray
baking sheet lined with paper towel or cotton cloth

Instructions:
  1. Mix all ingredients* (except oil) in a medium mixing bowl. Use wooden utensil to mix together, or use a mixer if you're fancy!
  2. Shape/roll into meatballs, about 1-1.5 inches in diameter, and place on tray or plate. Continue until you've used up the entire mixture
  3. Add a few tablespoons of oil to a skillet on medium-high heat
  4. Place meatballs in the oil (carefully -- the splashing oil BURNS -- I often use tongs to transfer the meatballs to prevent the splash)
  5. Flip the meatballs every 2-3 minutes, until browned on all sides. It usually takes 10-12 minutes to cook them through -- I always cut one open to ensure it's medium-well
  6. Transfer meatballs to the tray lined with cotton cloth or paper towels.

SERVING:
Place a helping of the squash with sauce on a plate, and top it off with a load of meatballs! ENJOY!!!!

*If you want to use fresh pumpkin puree, handle the pumpkin similar to the spaghetti squash. Cut a pie pumpkin in half, remove the seeds, place open face down on a baking sheet, and bake) -- pumpkin usually takes longer than the spaghetti squash -- check it at 30-40 minutes. Cook longer if needed. After it cools, you can easily pull the flesh away from the skin, and then place the flesh in a blender or food processor, and puree! Freeze leftovers for future cooking endeavors.

Tuesday, August 27, 2013

Pumpkin-kissed chicken nuggets

I should be cleaning my house. Seriously. Both kids are asleep, the husband is out of town, and I didn't quite get through the normal "drill" this evening. (And there is those five loads of laundry I did this weekend which I have yet to fold.) But who wants to clean when one can be blogging about food? Not this lady. (Besides, I've accepted that my house will be partially disastrous for the next 20 years.)

On to said food...

A friend bought a book for me called "The Best Homemade Baby Food on the Planet...," from which I I modified (significantly) a recipe for "chicken nuggets." Perhaps what I should say is that I referred to that recipe simply to discern the temperature at which the nuggets were baked.

Instead of using chunks of chicken breast, I used a combination of ground turkey and chicken breast meat, simply because the ground meat is super moist, and I intended to skip the traditional four-part breading process (milk, flour, egg, breadcrumbs), and use shredded coconut only. This was inspired by an experience making paleo fish sticks (that required a three-step process: coconut flour, then egg, then shredded coconut). As it turned out, the egg wasn't working (maybe because coconut flour is SUPER absorbant), so I quit and just dipped the fish in water before rolling in shredded coconut. They turned out marvelously. The lazy chicken-nugget-breading process was born!

Without further adieu, here is the recipe.

Ingredients
1 pound ground meat (turkey, chicken, beef...)
1/2 C pumpkin puree
1/4 C blanched almond flour or almond meal
garlic and sea salt to taste
1 C shredded coconut (you may need a bit more, so keep the bag out until you complete the breading process)
1-2 C coconut oil (this can vary a lot -- if you observe the medium-heat frying requirement, and your pan isn't too large, then 1 C should be sufficient)

*you could omit the garlic and use cinnamon for a sweet version

Instructions
  1. Preheat oven to 400 F.
  2. Place 1 or 2 baking sheets out.
  3. In a large mixing bowl, add all ingredients except shredded coconut and coconut oil. Mix thoroughly. A mixer will do the job more quickly than your wrist/spoon.
  4. Place shredded coconut in a bowl or on a plate.
  5. Scoop about 1-2 tablespoons of the mixture and flatten it a bit.
  6. Roll the flattened "ball" into the shredded coconut, and smush it down (to encourage the coconut to stick to the mixture). Repeat this until all of the mixture has been used. (I like to lay them out on a plate to carry over to the stove for frying -- stacking them works fine.)
  7. Place 1 cup of coconut oil into a frying pan, and heat on medium for a few minutes. Then add the "nuggets" (as many as will fit, still leaving enough space to get a utensil in for flipping -- I use a small turner).
  8. Fry for 2-3 minutes per side (careful not to burn them), then remove them to the baking sheets you set out previously. (As the coconut falls off in the oil, it may burn over time -- you can scoop it out if you wish -- I keep a bowl near my frying pan for collecting the stray coconut.) You may wish to place them onto a paper-towel-lined plate before putting them on the baking sheet:
  9. I tend to use parchment paper because I'm REALLY lazy when it comes to cleaning baking sheets.


    I think this is about 2 pounds worth.


  10. After all nuggets have been fried and placed on the baking sheets, pop them into the oven for 15-30 minutes (until golden brown and/or until internal temperature is at least 160F). 
These nuggets freeze well. If you freeze them, don't defrost them prior to re-heating. Simply place the frozen nuggets on a plate, and microwave on high power for about 4 minutes (time may vary depending on size of the nuggets -- too long and they will get hard, not long enough and they will be too cold).

If you are reading this blog and have advice for the perfect combination of fry-time and cook-time to acquire excellent crispiness, please advise!  I found a variation in crispiness nugget-to-nugget.

Oh, and this recipe is easy to double (or quadruple) the recipe, as I did here:
    Yes, that's quite a stack! Four pounds of ground turkey and chicken breast.


Friday, August 16, 2013

Long lost garden updates

Happy August!  I've taken many photos of my garden over the summer with intention to blog, but never could afford the time. Long story short: we vacationed for two and a half weeks during late June and early July. That was bad. Really bad. Lesson: Never leave my garden during peak-growing times.

After returning from vacation, I spent a bit of time cutting grass (with scissors) that surrounded the squashes I had planted along the fence. My beans are all toast, as are my cubes. I also managed to spend ten to fifteen minutes a few days weeding, which felt horribly futile. Not only were weeds encroaching viciously on my vegetable plants, but the rains had washed a lot of nutrients out of my soil (a reality I gleaned from chatting with my seasoned-gardner of a neighbor last week).  

I managed to get the kids into our local nursery one rainy day earlier this week to pick up some fish-based fertilizer. I had refrained from ever using fertilizer to keep things as organic as possible, but I chatted with an organic farmer at my local Farmer's Market last week, and she suggested fish and/or seaweed based fertilizers.

My wee babe went down for his nap this morning at 8:30, and I managed to get Peanut outside to enjoy his sandbox while I labored away in my so-called garden.  After one hour I managed to remove weeds from my tomatoes and broccoli. Insane. But I figured there would be no point in fertilizing the weeds, so it had to be done.  I hope to get to my carrots and what's left of my greens this weekend.

Here are before and after photos from this morning...

And yes, my tomatoes are at least partially blighted.

Thursday, May 23, 2013

Nutty fruit bars

Ever since going Paleo, processed foods are rarely an option. However, many Lara Bar varieties contain nothing more than nuts and fruit for the most part. I've bought several boxes of them, as they are handy when traveling or out-and-about with the kiddos. Every time I read the label of one of the bars, I think to myself, This is basically nuts and fruit -- I should be able to make these.

So this recipe, while original in the sense that I didn't look it up and have never seen a recipe similar to this, was inspired by the Lara Bars I've eaten.
Close-up of a half-eaten nutty fruit bar
Ingredients
1 C dried apricots (no suger added)
1/4 C dried cranberries
1/2 C almond meal
1 C unsweetened coconut flakes
1/3 C pepitas*
1/3 C sunflower seeds*
2 tbsp coconut oil (melted) + some for greasing pan

Instructions
  1. Preheat oven to 325 degrees F
  2. Grease baking pan (I used a stone bar pan
  3. Place dried fruits and coconut oil into a blender (or Blendtec). Grind or pulse until combined, scraping as needed
  4. Add the dry ingredients, and pulse until well combined, or until desired texture is achieved
  5. Scoop out the ingredients onto the baking pan; spread out and then smash down to really pack the mixture together. It's very sticky -- you may want to lube up your fingers with the oil, or use a dough roller or flat, wooden utensil. Confession: I just used my bare hands and licked them when I was done (YUM)
  6. Bake for 20 minutes, or until golden brown
  7. Remove from oven and set on cooling rack. I cut mine after five minutes of cooling
  8. Store in sealed container in fridge once cool
Since I concocted this recipe on the fly and gave no consideration to how much the recipe would yield, I ended up a bit short in terms of filling the bar pan. I just spread the mixture out, smashed it down, and formed it to a thickness I thought made sense. Doubling the recipe would yield thicker bars (surely that would be a good thing, but may require additional cook time). I cut mine into eight, uneven rectangles, but I think nine or ten would have been more appropriately sized. I used a Pampered Chef medium-sized bar pan.

These snacks are delicious; they're chewy but not sticky (to touch). I think both the sweetness and the chewy texture will accommodate more nuts/seeds than what I used in this recipe. Future experimentation may be required!
* Any nut or seed could be substituted for the pepitas and/or sunflower seeds. Additionally, depending on texture preference, the seeds (nuts) could be ground prior to mixing with other ingredients.

Nutritional information
Serving = 1 bar
8 servings per recipe
Per serving:
Fat (g)       15.5
Protein (g)   4
Sugar (g)    13.1

Tuesday, May 21, 2013

Coconut butter

I've been rather obsessed with paleOMG's coconut klondike bites (which I refer to as coconut cups, for short) for the past few months. The recipe calls for coconut butter, and paleOMG blogger, Juli Bauer, shared a friend's recipe for that. It includes processing a package of coconut flakes in a food processor until it gets soft and creamy like butter.

I have followed that protocol and used it in the coconut klondike bites recipe, but found the texture a bit too gritty to enjoy eating by itself. The other thing I disliked was that it hardened back up, and to make it spreadable again, microwaving or additional processing was required.

You can buy coconut butter (it's pricey), and after reading the labels of several brands online, I realized that coconut oil was an ingredient. So, I decided to add some to mine! Much to my delight, the coconut oil really improved the texture, and while it does firm-up slightly as it cools/sets, it's still soft enough to be spreadable without any heating required!

I LOVE coconut butter!

I love to eat coconut butter by the spoonful as a snack, or stuff dates with it (that's a delicious gem that I gleaned from Juli's cookbook, "OMG. That's Paleo?"). So, so yummy (with or without the date).

Here's how I make mine.

Ingredients
12 oz bag unsweetened, flaked coconut (I like Bob's Red Mill brand)
3-4 tbsp coconut oil
1 pint canning jar for storing it (or other container)
One 12 ounce package of coconut flakes yields one pint of coconut butter. I buy coconut flakes by the "case," which includes four packages. I pay about $3 per bag, which means my cost is only slightly higher than $3 for a pint of coconut butter (including the cost for coconut oil), which is awesome considering that 16 ounces of coconut butter can run $10-15 from what I've seen.
Instructions (for Blendtec*)
  1. Dump coconut flakes into Blendtec. Run on Speed 1 for the whole cycle. Remove plastic cap and push contents down, gently, with a spoon handle (AVOID the blade, of course -- you need only to push down the top layer, to encourage movement of the solid pieces)
  2. Add coconut oil, then run on Speed 1 for another cycle (Use a spoon handle again to push down the top layer -- I focus on pushing down in the corners)
  3. Press the smoothie button for one cycle
Instructions (for "normal" blender or food processor)
  1. Add flakes and pulse
  2. Scrape as frequently as needed, until the flakes become pasty/buttery
  3. Add coconut oil
  4. Continue pulsing and scraping until smooth (my normal blender makes WONDERFULLY smooth coconut butter)
Storage
I store mine in the cupboard. It rarely lasts longer than a week (or a few days -- OOPS!). Not sure if refrigeration would be required or not, longer term.

*I'm new to my Blendtec, so I'm still experimenting. I think I can get this smoother than it turned out for me this time, and will update the recipe when I figure it out.

Sunshine banana muffins

I recently saw a post on the FB page for PaleoLifestyleMagazine, asking whether or not people ate dandelion greens. I've eaten greens on several occasions, and have been harvesting them from my yard! Just this morning I sautéed them in coconut oil until they wilted, and ate them as a side with my breakfast. I've also chopped them up, adding them to breakfast sausage (could be added to any meat).

I recalled a post that Jim McDonald (my local herbalist) had shared on a forum once, about a recipe for cookies using the dandelion petals.

You might be thinking Dandelion petals... in cookies? Aren't dandelions weeds?

Per the view of many suburbanites, who spend money on chemicals to kill the pretty, little, yellow flowers, I presume the answer is, "Yes." To herbalists such as Jim McDonald and others who enjoy eating for health, however, dandelions are nutrient-packed, edible and medicinal plants.

Said cookie recipe doesn't fit in to our paleo lifestyle, but I wanted to bake the dandelion petals I'd recently harvested into something my son would enjoy eating. After a bit of toiling, I decided upon banana bread, baked as muffins. (My toddler loves muffins -- I even make muffins out of meatloaf for his eating pleasure!)

I really like this paleo banana bread recipe from the CivilizedCaveman blog. I've made it several times, and both my son and husband love the bread! It's dense and moist, and delicious (I have an egg allergy, and since the recipe includes four eggs I don't technically eat the bread; but I couldn't resist indulging in a tiny smidgen the first time I made it -- it was awesome!).

Given the texture and moistness of the bread, I figured the recipe could handle about one cup of dandelion petals, keeping the rest of the recipe in tact, without compromising the texture (or taste).

Ingredients
4 bananas, peeled
4 eggs
4 tbsp coconut oil
1/2 C almond butter
1/2 C coconut flour
1 tbsp cinnamon
1 tsp baking powder
1 tsp baking soda
1 tsp vanilla
pinch of salt
1 C dandelion petals

It will take several dozen dandelions (depending on their size) to acquire 1 C of petals. I gathered them up and placed them in a vase of water until I could get to them. To remove the petals, squeeze the green base of the flower, and pull out as much of the yellow petals and white silky-looking stuff as you possibly can. Don't have quite one cup of them? Either go back outside to search some more, or just use what you have!

(Please note: if you use chemicals on your lawn, DO NOT eat your dandelions. You may want to forgo harvesting your dandelions if your immediate neighbor(s) use(s) lawn chemicals. Go visit your friend in the country and steal theirs. Or, better yet, MOVE to the country and grow your own!)

Instructions
  1. Preheat oven to 350 degrees F
  2. Grease muffin pan or 12 muffin liners
  3. Combine the first four ingredients (bananas, eggs, coconut oil, and almond butter) and mix well on medium speed*
  4. Add remaining ingredients EXCEPT for dandelion petals and mix well on medium
  5. Add dandelion petals, mix well
  6. Distribute mixture evenly between 12 muffin cups. They will be pretty full -- not to worry, as they won't raise significantly
  7. Bake for about 35 minutes (that's how long mine took in a silicon muffin pan)
Not the best photo, but there are two of the sunshine banana muffins. 
Again, I can't eat these since they contain eggs, but they are toddler-approved! My two-year-old son gobbled one up with no indication that he even noticed of the petals.

*If using a Blendtec or Vitamix, you can add all ingredients at once (in order: liquid then soft then dry) and mix it up quickly (batter).